Showing posts with label food. Show all posts

A Pizza My Heart Brooch

Pizza: the ultimate food. You can cover it in various meats, you can combine meats and veggies, you can make the crust from veggies, you can even have a none pizza with left beef if you want! The combinations and customization possibilities are endless. With Valentine's day coming up, I thought what better way to show my love for pizza, my ultimate Valentine, than to immortalize it in clay and proudly display it for the world to see! (Also Tuesday was National Pizza Day, so there's that.)

Heart-Shaped Pepperoni Pizza Brooch


Inspired by YouTube tutorials and photos I saw on Pinterest, I set out to make my very own brooch to symbolize my love for this savory treat. So far the comments I've gotten on it have been wonderful. From, "WOW, you MADE that??" to "I seriously want to eat that tiny pizza." I have to say I am honored that people think my tiny pizza is real food. That means a job well done in my book!

Heart-Shaped Pepperoni Pizza Brooch


If you're interested, I have prepared a special slice of information for how I created this brooch.

Here are the ingredients I used:
  • Polymer clay (I use Sculpey brand) in tan, white, yellow, red, brown, and translucent
  • TLS- Translucent Liquid Sculpey
  • Chalk pastels in brown, yellow, and red
  • Acrylic paints in the same colors
  • Glaze for polymer clay in satin or shiny
  • Inspiration photos and YouTube tutorials, especially this one:

Making a pizza out of clay is a lot like making a real pizza. The first step is to start with the dough.

Knead and shape the tan clay into a crust pattern. By placing it on a piece of course sandpaper, it gives it a similar texture to that of real pizza crust.

Heart-Shaped Pepperoni Pizza Brooch WIP


Then texture the crust around the edge with a brush and color it with some chalk pastels. I also mixed up the "sauce" by combining TLS, a bit of red clay, and a small amount of brown chalk pastels until I got the right consistency and color. The pepperoni were created by following the tutorial in the video above. The cheese was made by combining a small amount of yellow with white and mixing until well blended then stretching it out and forming it into pizza cheese that would fit over the middle heart.

Heart-Shaped Pepperoni Pizza Brooch WIP


Layer the sauce and the cheese on the crust. (See what I was saying, exactly like making a pizza only a lot more tedious!) After that, place the pepperonis in a pleasing manner upon the cheese. This is where the perfectionist in me started at pictures of heart-shaped pizzas and desperately tried to make mine look like them. And then I put some grease on it. (TLS and yellow pastels)

Now it's all ready for baking!

Heart-Shaped Pepperoni Pizza Brooch WIP


Because I wanted to make mine into a brooch, I placed the pin on the back and added more tan polymer clay and blended until it was similar to the original back. I then shaded it with chalk pastels and baked it again.

After adding a few more finishing touches, like painting on browned/burnt areas and glazing all the toppings, my masterPIZZA was complete! All that was left was to make a tiny pizza box to photograph and store my pizza brooch in. You can find that tutorial here, thanks to Images by Heather M.
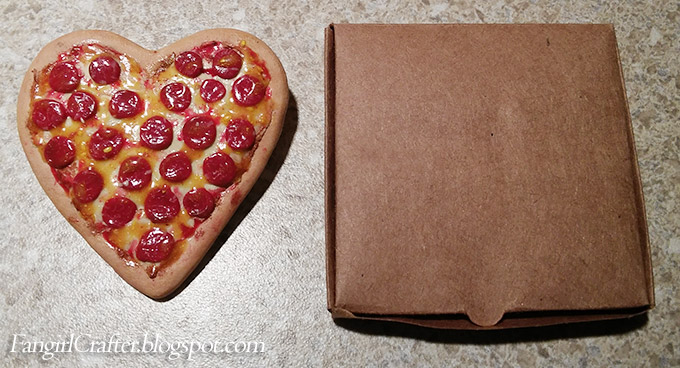
Heart-Shaped Pepperoni Pizza Brooch and box


Oh pizza, you complete me.

Heart-Shaped Pepperoni Pizza Brooch


From TMNT and Futurama to late nights gaming, pizza is a huge staple in geek culture. It's easy to come by, reasonably fast, and mostly cheap!

What's your favorite way to enjoy pizza?

Amulet of Talos Fit For a Dragonborn

Polymer Clay Amulet of Talos Tutorial by The Fangirl Crafter
Special thanks to Gladys from Usagi In Wonderland who gave me the Nord figure!


When I first began playing Elder Scrolls V: Skyrim a few years ago it quickly became my favorite game. An open world where I create my own character who has awesome Dragonborn powers?? Count me in! Since then I have also played a little bit of III: Morrowind and IV: Oblivion. One of the biggest features of the games are the Daedra and Aedra, basically the Greek Gods of Tamriel, who play around with the world and its people for their own entertainment. Of all of the deities in the game, the one that stood out most to me was Talos, AKA Tiber Septim. Though many refuse to accept him as a deity, because he was once a man, he is a favorite among the Nords of Skyrim. Not so much with those jerks the Thalmor, who had it outlawed during the White Gold Concordat.

Polymer Clay Amulet of Talos Tutorial by The Fangirl Crafter


But I digress. The Nords remind me of my own Norwegian heritage and so I feel a connection with Talos. Even though my own character is a badass Redguard, she still has the warrior heart of a Nord. In the game the Amulet of Talos allows the wearer to decrease their shout cooldown by 20%. If you don't play the game that probably means nothing to you, and that's okay! When I first saw it I immediately wanted one, and not just in the game. I searched the web hoping to find something in my price range, but I didn't come up with many results. As I had been playing around with the idea of working with polymer clay at the time, I figured I might as well try to make my own!

Polymer Clay Amulet of Talos Tutorial by The Fangirl Crafter


It had been over 10 years since I worked with clay last, and I was really impressed with what I was able to accomplish for a first go! Don't get me wrong, I made a LOT of mistakes. The point is, I did my best. And now you can too!

Polymer Clay Amulet of Talos Tutorial by The Fangirl Crafter